
Desolation Sound is my favorite kayaking destination. It is a kayaker’s paradise at the northern end of the Sunshine Coast in BC, in the Salish Sea. Whether you are planning a weekend trip or a longer expedition, here is a guide to help you prepare for your paddling adventure.
1. Why choose Desolation Sound?
2. Camping in Desolation Sound
3. How to plan your paddling route
4. What to pack?
5. Safety basics
6. How to get there?
Why choose Desolation Sound?
Desolation Sound is a good place for beginners. It is known for its calm, secluded, and warm waters. People say it’s the warmest water north of Mexico, and it’s common to see people swimming in summer. There are 11 designated campsites in the area; therefore, it is a good choice for camping newbies.
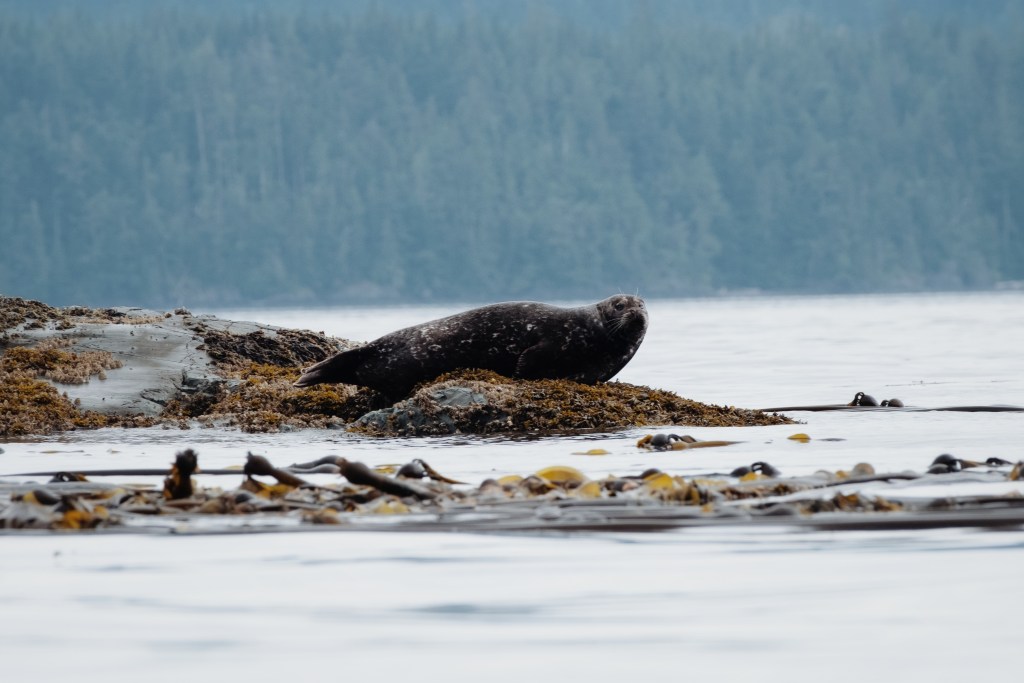
The scenery is very dramatic, with the South Coast mountain range in the background. You’ll likely see many harbour seals, bald eagles, river otters, sea lions, and sometimes humpback whales and orcas. Watch for coloured sea stars, oysters, and mussels along the rocky shore.


When to kayak Desolation Sound?
The best time to go is from May to early October. July and August are the busiest, so finding a campsite is challenging, especially on weekends. Start early to maximize your chances. I prefer to go off-season, in May, June, or October, even if there is a higher chance of rain.
Self-guided or guided tour?
It depends on your experience, confidence, and risk tolerance. In my opinion, Desolation Sound is one of the best places in BC for beginners and does not require a guide as long as you follow some safety basics and plan ahead. For overnight trips, rental companies ask you to have at least one person who knows the basic rescue techniques in the whole group.
One of the main benefits of having a guide with you is that you will learn about the land and the wildlife. If you can afford it, consider taking a guided tour with Klahoose Wilderness Resort. It is indigenous-owned, has the best location in Desolation Sound, and offers trips to watch the grizzlies in Toba Inlet.
If you want to plan your self-guided adventure, stay with me!
Note: This blog post does not contain affiliate links, and I only promote companies I have either tested and loved or received very positive feedback on.
Camping in Desolation Sound
There are 11 designated campsites in Desolation Sound, split into three areas:
- Malaspina Provincial Park: Feather Cove, Sarah’s Point
- Desolation Sound Marine Provincial Park: Hare Point, Grace Harbour, Bold Head, Tenedos Bay, Curme Islands (South, East, and West Curme Islands)
- Copeland Islands Marine Provincial Park: North and Middle Copeland Islands

Map of the designated campsites – from BC parks
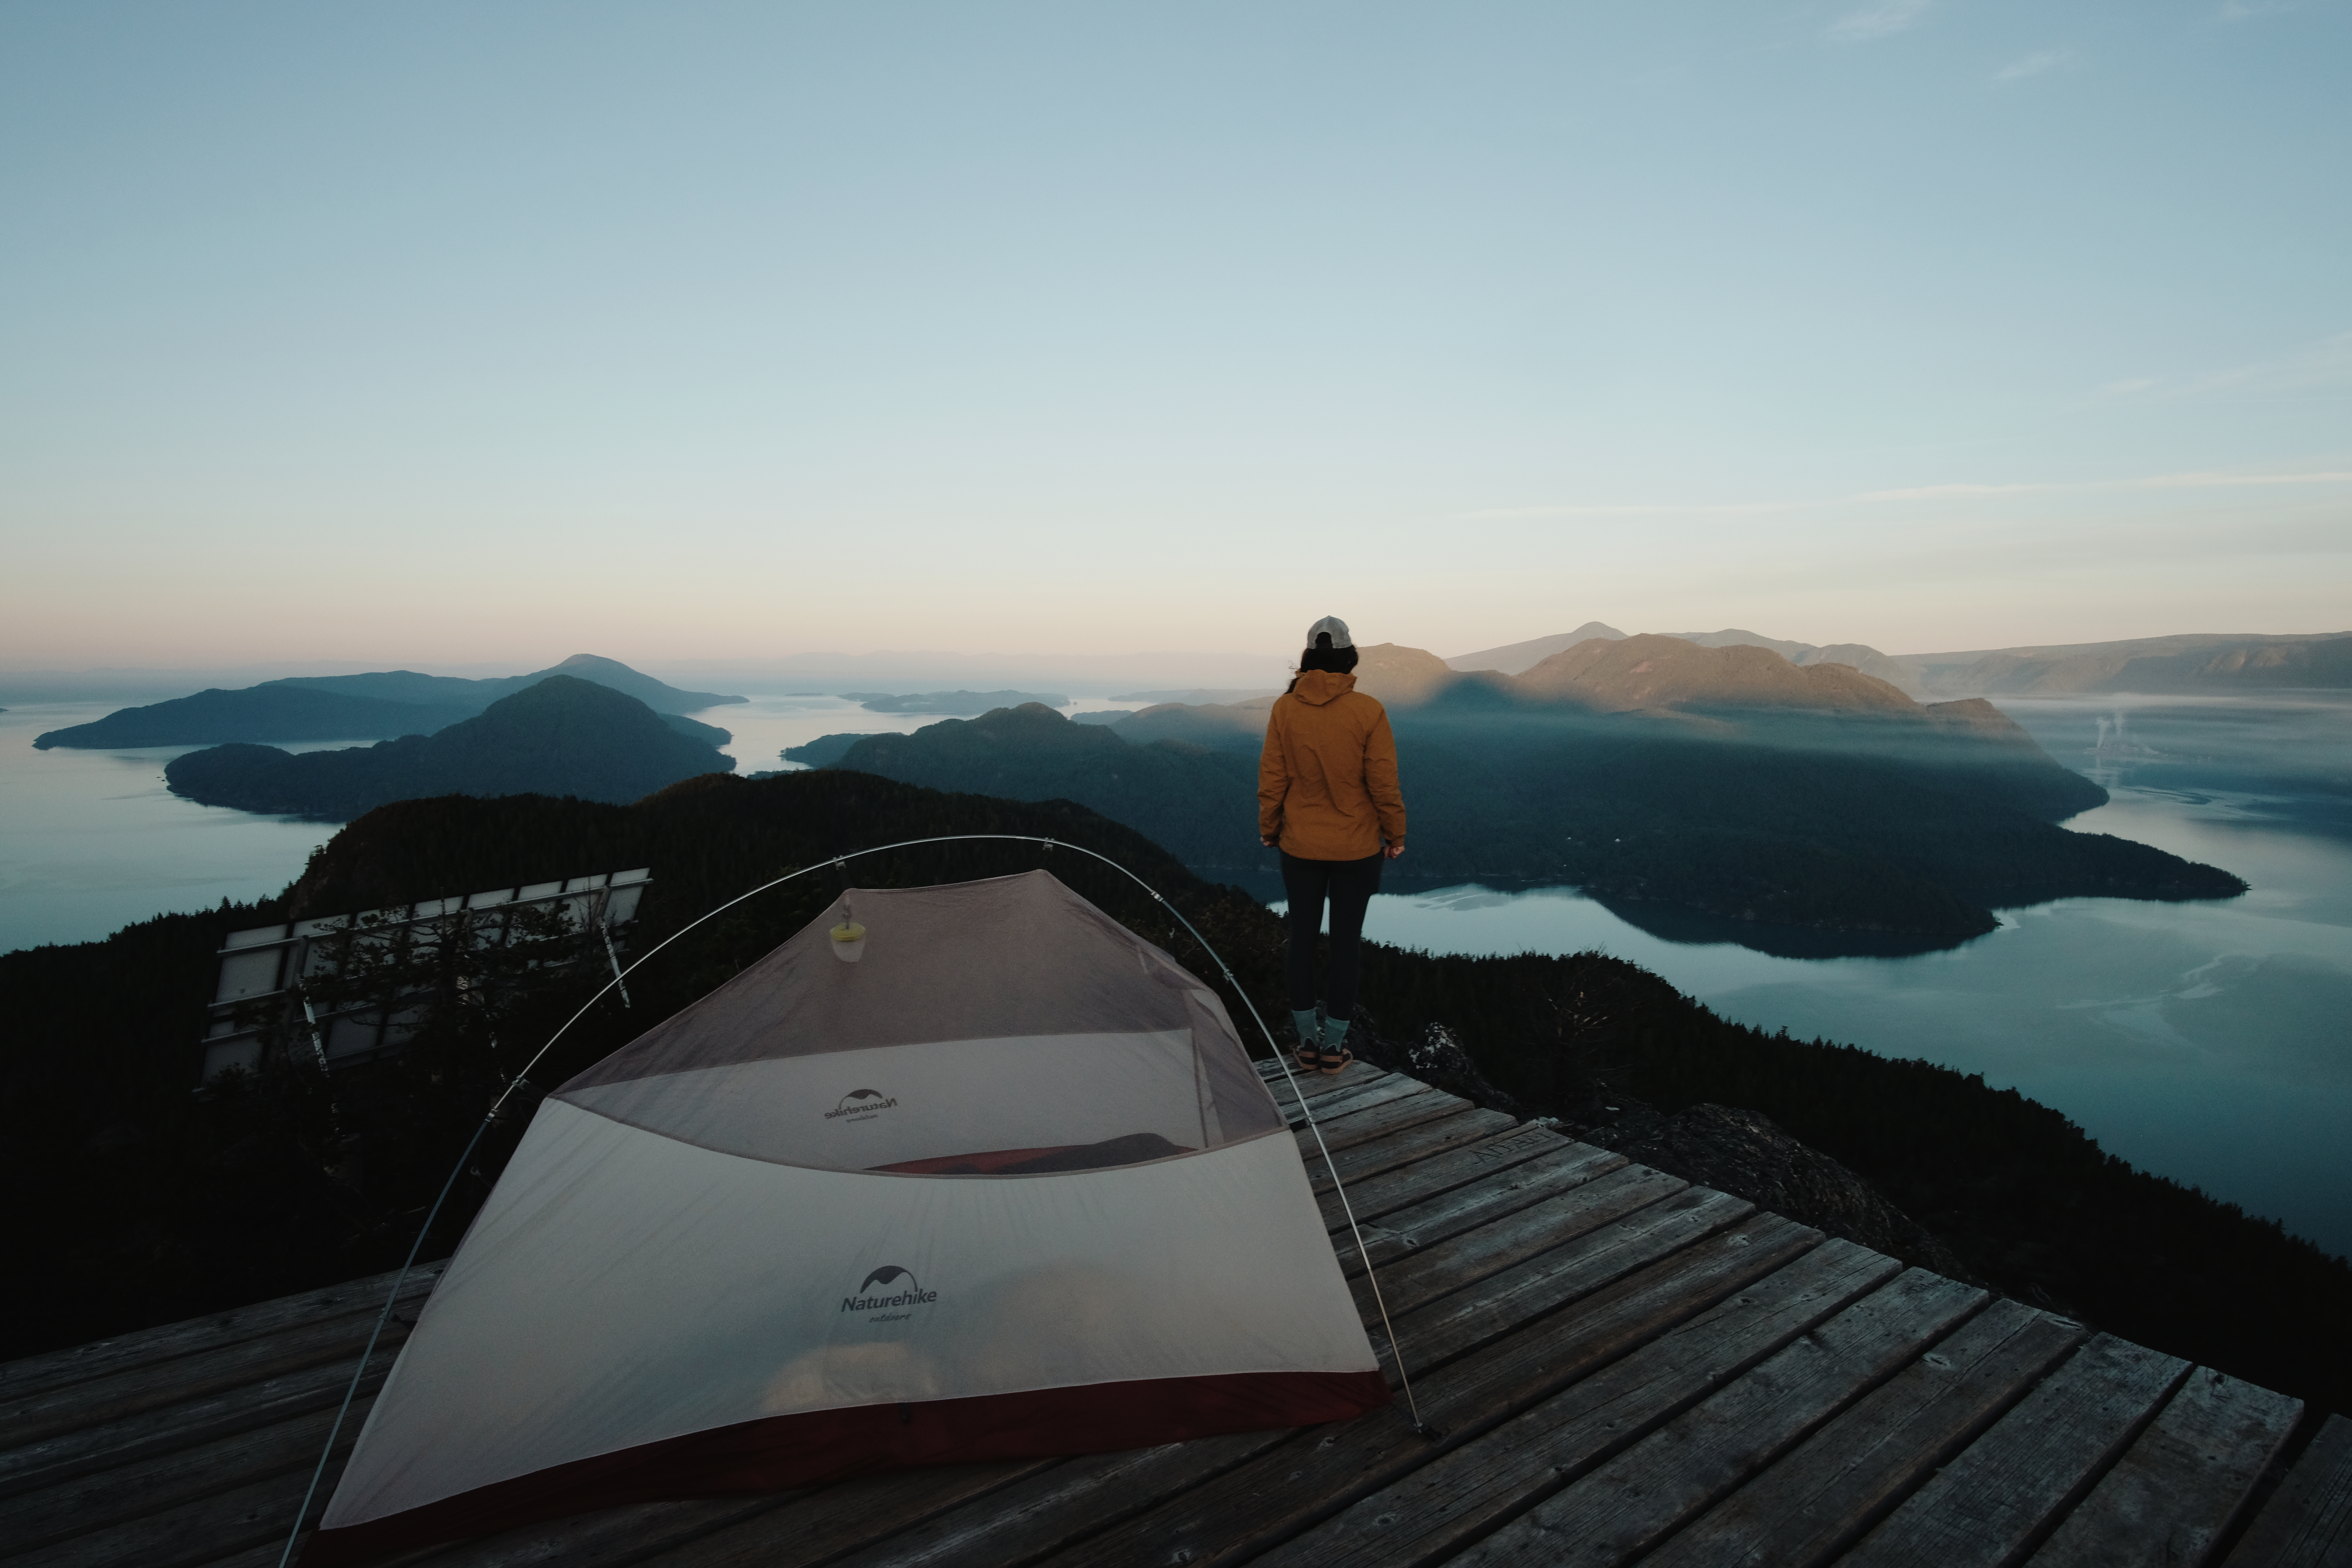
All the designated campsites have wooden tent pads where you can pitch your tents and pit toilets. Campfires are forbidden within the Marine Parks. I visited all the campsites except for Grace Harbour, which is a bit isolated from the usual paddling route. All the campsites are nice, but the Curme Islands and Copeland Islands’ campsites are gems. Unfortunately, that also means they are crowded in the summer. Feather Cove, Bold Head, and Tenedos Bay make great alternatives during the busiest times. If you have time, I recommend going north, out of the marine park’s boundary, and trying the unregulated campsites.
Camping fees within the park’s boundary are $5 per person per day and must be paid online via the backcountry registration page. You can find the BC park campsites map here.


Wild Camping
If you camp outside the Marine Parks, you’ll have to be careful where you choose to land. Finding a flat area to pitch your tent can sometimes be tricky, and you could be forced to stop sooner than expected because of fatigue or weather conditions. Therefore, I suggest you always have a plan B if you can’t reach the spot you have decided to land. Whether you camp within a marine park or not, please follow the Leave No Trace principles and be respectful of the wildlife and people who live on the land.
Finding fresh water
Most designated campsites don’t have a water supply nearby, so you’ll need to carry water with you. Unwin Lake, in Tenedos Bay, and Black Lake, in Roscoe Bay Marine Park, are accessible via a short hike and are great options to fill your water tank and take a dip. Outside the Desolation Sound Marine Park area, further north, it’s easier to find fresh water as many waterfalls are accessible from the shore.

How to plan your paddling route
How long do you need for a kayaking trip in Desolation Sound?
There are many options, from a day trip to a week-long excursion. Consider allowing at least two full days and one night to enjoy the area fully. Also, unless you live on the Sunshine Coast, it would be quite a long trip for just one day on the water. When planning your trip, consider the tide times and wind direction because they can make a difference in your paddling pace. Allow enough time during the day to take breaks, explore the coves and go for swims.
Itinerary ideas
The beauty of sea kayaking is that you have endless possibilities of routes, you just need a map and a bit of imagination, and there it is. You must consider your paddling pace and how long per day you are willing to paddle. The following routes are easy paddling suggestions.
2 days: a glimpse of Desolation Sound
- Day 1: Okeover to Feather Cove.
- Day 2: To the Curme Islands and back to Okeover.
Launch from Okeover and stop for lunch at Hare Point campsite, whose picnic tables offer great views over Malaspina Inlet. Get out of Malaspina Inlet into Desolation Sound and go west to Feather Cove. The campsite in Feather Cove has excellent kayaking access and offers good views over the sound.
The next day, start early and head north to Curme Islands. The crossing to Mink Island is quite long, but the waters are usually calm. There, enjoy the beautiful transparent and warm waters, go for a swim and have lunch while looking at the coast mountain peaks in the distance. After a break, head back following the shoreline of Gifford Peninsula and enter Malaspina Inlet. Note that the narrower parts of Malaspina Inlet can get stronger currents, so pick your time wisely.
3-4 days: the jewels of Desolation Sound Marine Park
- Day 1: Lund to Sarah’s Point via Copeland Islands
- Day 2: Sarah’s Point to Curme Islands
- Day 3: Roscoe Bay and Martin Island
- Day 4: Martin Island to Lund.
This route takes you through the two most beautiful island groups of Desolation Sound. Start with the Copeland Islands, about one hour paddle from Lund. You can choose to set up your camp there or stop for lunch and continue your way to Sarah’s Point, where sunsets are stunning.
The next day, head out to visit the lovely Curme Islands. The campsites on Curme Islands are the most popular in the area, and it’s easy to understand why: transparent and warm waters, gorgeous views of the mountain peaks, and secluded coves.
On the third day, start early and visit the set of islands northeast of Curme Islands: Otter, Morgan, and Melville Islands. Continue north, cross the channel, and head north towards Roscoe Bay Provincial Park. There, you can walk to Black Lake and swim or fill your tank with fresh water. The hike to Llanover Mountain offers beautiful views over the sound and makes the perfect paddling break. Then, head back south following the shoreline of West Redonda Island and stop at Martin Island. Set up your camp on the beach, which is an informal campsite.
On the last day, head back to Lund via Station and Kinghorn Islands. Remember to stop by the Copeland Islands if you didn’t go on your way in.
6 days+: up north to Toba Inlet
- Day 1: Okeover to Curme Islands
- Day 2: Curme Islands to Walsh Cove via Waddington Channel
- Day 3: Walsh Cove to Gatineau Bay via Pryce Channel and Toba Inlet
- Day 4: Toba Inlet to Homfray Creek
- Day 5: Homfray Creek to Bold Head via Homfray Channel
- Day 6: Bold Head to Okeover
This route will take you to the mouth of Toba Inlet, one of the most beautiful areas I got to paddle. The first time I went there, I chose to make a loop from Okeover and circle clockwise around East Redonda Island.

What to pack?
In addition to your usual camping gear, here are the things you should pack when going on a kayaking adventure.
Safety Gear
If you have your own kayak, you’ll need to bring the following items required by Paddle Canada along:
- A life jacket or PFD (personal floating device) per person
- Buoyant heaving line (or floating rope), at least 15 meters long
- Pump
- Sound signalization device – usually a whistle attached to the life jacket
- Paddle float for self-rescue
- Navigation lights (if paddling by night) + spare batteries
If you rent a kayak, the company will provide you with the required safety gear.
Navigation/Signalisation:
- GPS or Satellite Phone: not mandatory if you stay within the Marine Park boundaries as there is good cell coverage.
- VHF radio (+ learn how to use it): optional but recommended.
- Compass: essential to navigate in the fog
- Waterproof Marine Chart or Marine Map
- Tides Chart of the area (you can find them online and print them or keep them on your phone.)
I tend not to rely on electronic devices as they can get flooded or run out of battery. Therefore, I always bring a compass and a paper map.
Clothing:
- Waterproof jacket: keeping your upper body dry is the most important, as you will have the spray skirt to protect your bottom.
- Quick-dry pants or waterproof pants + shorts for warm weather
- Spare dry clothes: always keep them in a dry bag. If you fall into the water, you’ll have to change quickly to avoid hypothermia.
- Warm layers: avoid cotton, which is extremely long to dry.
- Water shoes: good water shoes are a must-have with the thousand sharp oyster shells covering the coast.
- Runners or camping spare shoes
Even in summer, you can get cold very quickly when on the water, and the weather changes fast in the ocean.
Other:
- First Aid Kit
- Dry bags
- Waterproof phone case
- Water tank
- Tarp if going on rainy days
- Power bank (if you use electronic devices)
- Towel(s)
Food:
One of the most challenging parts of planning a multi-day self-guided kayaking trip is planning the meals. Here are a few tips to help you prepare.
- Along with food to cook, bring dehydrated meals. They are great when you are tired and don’t want to spend much time cooking or when it’s cold and raining and you don’t want to stay in the cold for too long.
- Bring fruits and veggies to cook, which can last days before getting bad.
- Keep bars, nuts, and dehydrated fruits for snacks in your easily accessible dry bag.
- Bring an extra day of food, at least. You could stay stuck on the shore for a whole day if the conditions are bad or underestimate how many calories you need after a long paddling day if you are new to long trips.
- Remember that you can carry a lot of weight in a touring kayak (it will make your kayak more stable, but you’ll be slower), so you can have fancier meals than when backpacking. Nothing is better than a bottle of wine after a long day paddling (I’m French; I can’t help it).

Safety basics
Get the skills
Before planning a self-guided kayaking trip, I suggest you take a sea-kayaking course. A course will give you the safety basics like assisted rescue and self-assisted rescue, how to use the gear etc. But also, they will teach you how to paddle efficiently (thus how to save energy) and navigate. It is optional for beginner-friendly areas like Desolation Sound, but it is so worth it.
I took a course with Deep Cove Kayak, and it was excellent. The course is called Paddle Canada Level 1 Skills and costs about $350 before taxes. You have six lessons of 3 hours each, over two weeks. It gave me enough confidence to plan my first week-long self-guided trip and go on overnight solo trips shortly after.
The must-do: a Float Plan
Always leave a float plan when you are going out on the water. The float plan includes the following:
- Your intended route.
- The campsites you’ll stop by.
- People descriptions.
- Colours of kayaks and life jackets.
- An emergency contact.
They will ask you to fill out a float plan if you rent kayaks. If you are going on your own, always leave your float plan to someone you trust.
Weather, Tides, and Currents
You can have years and years of kayaking experience and still don’t know how to “read the water.” It is a complex science, and the best kayakers often argue about currents. Yet there are a few basics any newbie can get a grip of and ensure the party’s safety.
The wind: In areas like Desolation Sound, where the currents are not strong, the wind is the main factor you have to consider. Check the wind speed and directions. It all depends on your comfort level, the area features (if it’s a narrow channel or an open area), and the direction, but I would say that you can be comfortable with wind under 18 km/hour (10 knots). I use several apps to get the wind forecast, like Windy App and Ventusky.
Tides and currents: currents are influenced by the tides, among other things. When paddling, it’s always good to know when it’s a rising tide (flood) or outgoing tide (ebb). In Desolation Sound, if you are launching from Okeover Inlet and going north, you want to leave with the outgoing tide, when the water in the inlet is drained out into the ocean so that you can save energy and time. But as there is almost no current in Desolation Sound (the maximum you can see is 1.5 knots), the wind direction will have a more significant impact there. I use the app Tides, which gives you the tides chart of the area you are located in and works offline.

a Kayaking and Hiking Guide to Anvil Island, BC
Where to camp, itinerary ideas, what to pack and safety basics.
Prepare for your upcoming kayaking adventure.
How to get there?
Where to launch?
You can launch from Okeover Inlet or Lund. I prefer to launch from Lund as I find the Copeland Islands more interesting than the inlet, but it’s slightly longer. If you rent kayaks with Powell River Kayak, you’ll start from Okeover Inlet, and if you rent with Terracentric Adventures, you’ll launch from Lund. If you have your own kayak, note that there is a launching fee of $4 at the public boat ramp in Lund, and the parking costs $10 a day.
Getting to the Sunshine Coast
From Vancouver or Squamish, it takes roughly 6 hours to get to Lund or Okeover, including driving and ferry times and ferry waiting times. The first ferry from Horseshoe Bay to Langdale (Gibsons) takes 40 minutes. Then, you have to drive north to Earls Cove (approximately 1h30 drive). There, take the second ferry to the upper part of the Sunshine Coast. This ferry is non-bookable and takes 50 minutes to reach Saltery Bay. I consider this route the most beautiful ferry route in BC. From Saltery Bay, it takes about one hour to reach Lund or Okeover. Powell River is the last town on your way. Lund has a general store (with ATM), a bakery/cafe, and a restaurant.
Find ferry schedules and fees on the BC Ferries website.
Interesting stops on the way:
- Towns: get a beer and enjoy the stunning view from the Tapworks brewery patio in Gibsons. Try one of the many good Sechelt restaurants and go to El Segundo for delicious and creative cocktails.
- Wander on the many beaches and parks. Make sure you stop by Davis Bay, Smuggler Cove Provincial Park, and the Madeira Park/Garden Bay area.
- Try one of the excellent campsites along the way: Porpoise Bay, Katherine Lake, and Mermaid Cove are my favorites.
- Take a short hike to Pender Hill for great views and walk to the Skookumchuck narrows to watch the power of the Sechelt rapids.
- Are you a climber? Powell River offers one of the best climbing spots in BC. For the more adventurous, visit the Elder Valley.
- The Sunshine Coast Trail is the longer hut-to-hut trail in Canada (180km). If you have to pick a section, I recommend the Tin Hat Mountain loop.

Additional Information
Here are some frequently asked questions about kayaking trips in Desolation Sound:
Are there bears in Desolation Sound?
Black bears are present along the mainland shoreline, fishing for herring spawn or salmon. Further north, in Toba Inlet, you can spot grizzlies in the fall. It’s unlikely you’ll encounter black bears while camping on the islands, but in any case, always hide your food in bear caches.
Can you fish in Desolation Sound?
Yes, but there are limits, and you need a license. Also, be aware of the fishing closures and restrictions in the province. They can be to protect the habitat but also prevent poisoning due to red tides.
Can you canoe in Desolation Sound?
I’m not a canoer, but I know people do canoe in Desolation Sound. The currents being mild and the area protected, it is possible. For canoers, I would suggest having a look at the Powell Forest Canoe Route, which might be more adapted.
Useful resources:
- BC marine trails website
- Water classification map by Sea Kayaking Alliance of BC
- Book: Sea Kayaking, by John Down.
If you have any questions, think I forgot helpful information, or need help with your upcoming trip preparation, let me know in the comments!


Thank you for this very informative post! A friend and I are contemplating a weeklong kayak camping trip in this exact area, and your post is very helpful.
I have a question I’m hoping you can answer: do you know how one can plan for the current at the northern end of Waddington Channel? I have read that the current in much of that channel is rarely above 1 knot, but that the narrower northern end can be higher — but I haven’t found any info on how much higher, nor of the timing of the current. I can’t find any current stations for that area. The closest tidal station I can find is for Channel Island, and there is substantial tidal exchange, but I can’t find any info on how that translates to Waddington Channel, either in regards to the speed of the current or to the slack/max flood/max ebb timing.
Thanks!
LikeLike
Thank you for your feedback Andrew! I’m so glad you found the article helpful.
I’m excited for you; I’m sure you’ll love the experience!
I asked myself the same question when I planned the trip, and unfortunately couldn’t find any information about currents and slack timing in that area. From what I could observe when I was paddling Waddington Channel, there are indeed stronger currents in the northern end, I can’t tell precisely how much higher, though, but it shouldn’t exceed 2-3 knots, and it’s concentrated in a small area, False Pass (between the Gorge Islands and the northern entrance of Waddington Channel). When I was there, I could observe a stronger current but nothing concerning (but it would depend on the time of year). I took advantage of the flood tide as I was travelling north. If you are paddling north, I suggest camping on the beautiful Gorge Islands, so you get to observe the currents and leave your camp at flood tide or slack time the next day.
I hope you have an amazing trip and let me know if I can help in any way.
LikeLike
Thanks!
LikeLike
Hi Andrew! I have a few questions for you.
1. How much longer does it take to get from Lund- curme islands vs okeover-curme islands?
2. I want to include Savary island in my trip (I have 3-4 nights). Is it possible to kayak from the Curme islands to Savary in a day? I am not an experienced paddler!
Thank you 🙂
J
LikeLike
Hi J,
I assume the questions were for me and not for Andrew 🙂
1. Getting to the Curme Islands from Lund is slightly longer from Okeover, roughly 1-2 hours more depending on the conditions, your pace etc. The difference is about 6 km.
2. The paddling distance Curme Islands to Savary is about 26km. It is doable to do in one day, but I wouldn’t recommend it if you’re not used to paddle that distance. To give you an idea, with my loaded kayak it takes me about 6 hours to paddle 23 km. I’m not a fast kayaker, and I stop quite a lot to take pictures etc. If you start to paddle early it’s doable, it will just be a long day. Check the wind forecast for the Strait of Georgia, as you will leave “protected waters” when crossing from the Sunshine Coast to the tip of Savary, and that could slow you down. I would recommend a stop at Copeland Islands if it fits in your trip, it’s a lovely spot to camp.
Enjoy your trip!
Barbara
LikeLike